Building Flutter Apps with Clean Architecture Using GetX
Mastering Clean Architecture and GetX for High-Performing Flutter Apps
I am a full stack developer, a Machine Learning enthusiast & a Flutter Developer. Also, I am a budding Entrepreneur!
I am a student of Life and believe in building tech for people.
I love contributing to open-source projects and use my knowledge to develop a software solution for general problems arising in the community.
Hello, Flutter aficionados! 🚀 In this blog post, we're about to embark on an exciting journey into the world of Flutter clean architecture using the incredible GetX package. Whether you're a seasoned developer or just starting your Flutter adventure, this guide will help you build organized and maintainable Flutter apps. So, grab your coding capes, and let's dive in!
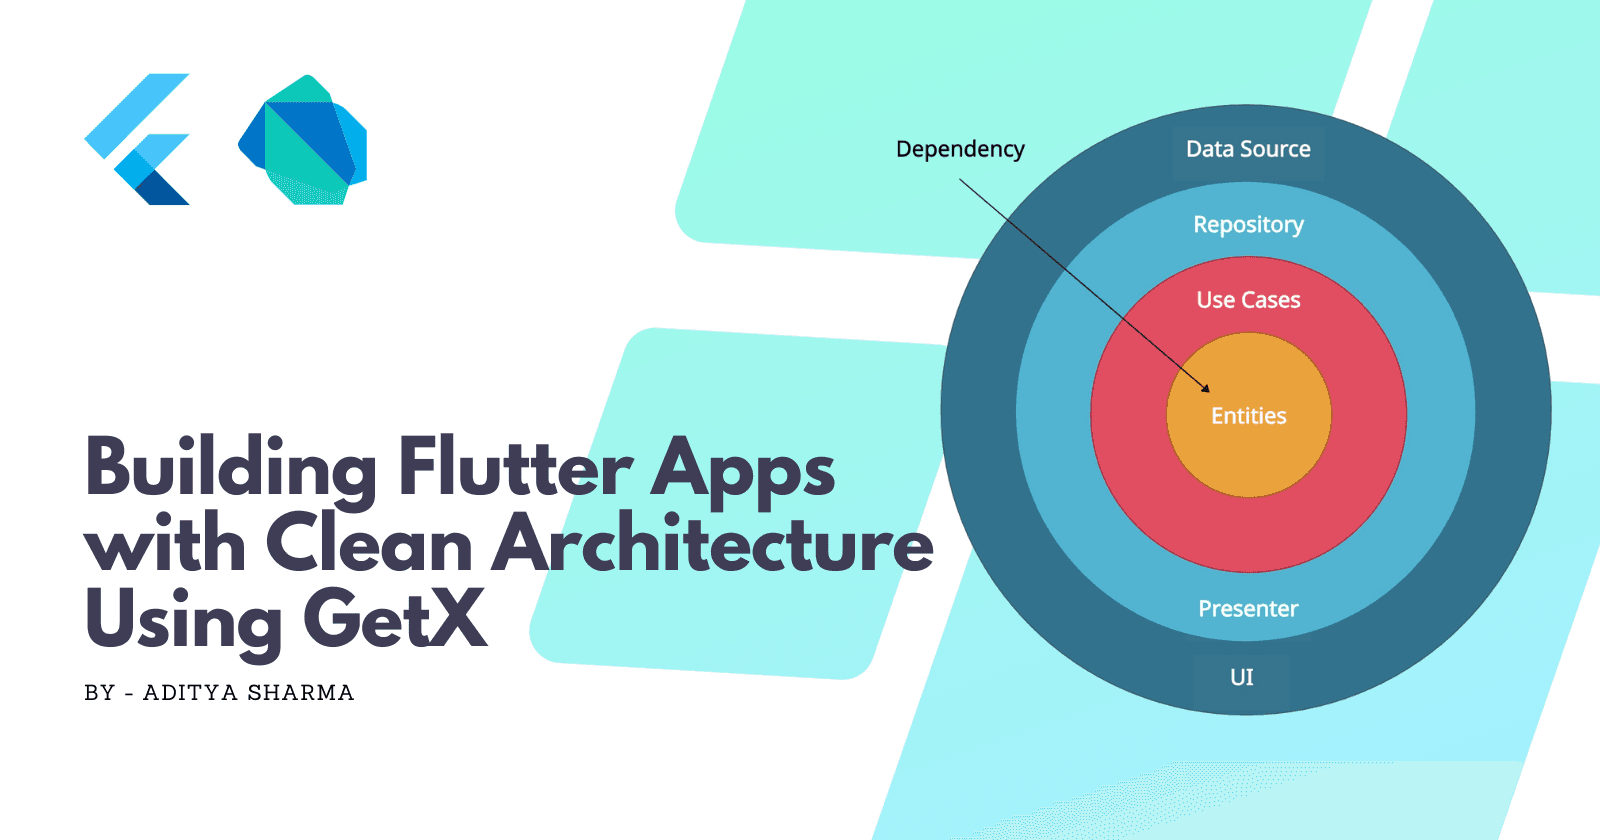
What is Clean Architecture?
Before we delve into the nitty-gritty of Flutter clean architecture with GetX, let's start with a quick introduction to clean architecture.
Pros of Clean Architecture:
Modularity: Clean architecture promotes a modular approach, making your codebase easier to understand and maintain.
Testability: It encourages writing unit tests and makes your codebase more test-friendly.
Scalability: Your app can grow and evolve without major architectural changes.
Independence: The architecture keeps external frameworks and libraries at bay, preventing them from tightly coupling with your code.
Cons of Clean Architecture:
Initial Complexity: Setting up a clean architecture project might seem more daunting compared to a simple structure.
Learning Curve: Developers new to clean architecture may take some time to fully grasp its concepts.
Now that we're clear on the basics, let's roll up our sleeves and get started!
Project Setup
This project is written using the current latest stable versions of:
Packages
Before we start coding, let's gather our tools and libraries. Here are the essential packages we'll use:
getX: The Swiss Army knife for state management. (You can use any kind of state management you prefer to work with such as providerorflutter_bloc)
freezed: A code generation package for creating immutable data models.
get_it & injectable: For dependency injection.
go_router: A declarative routing package that provides a convenient, URL-based API for navigating between different screens.
pretty_dio_logger: A delightful logger for HTTP requests.
Let's include these packages in our pubspec.yaml:
dependencies:
  get: ^4.6.6
  retrofit: ^4.0.2
  dio: ^5.3.3
  get_it: ^7.6.4
  injectable: ^2.3.0
  go_router: ^11.1.2
  pretty_dio_logger: ^1.3.1

dev_dependencies:
  flutter_test:
    sdk: flutter
  flutter_lints: ^2.0.0
  build_runner: ^2.4.6
  freezed: ^2.4.3
  json_serializable: ^6.7.1
  retrofit_generator: ^7.0.8
  injectable_generator: ^2.4.0
Folder Structure
Organization is key in clean architecture. Here's a recommended folder structure:
lib/
  ├── config/
  │     ├── injection/
  │     ├── router/
  │     └── themes/
  ├── data/
  │     ├── datasources/
  │     │    ├── local/
  │     │    └── remote/
  │     └── repositories/
  ├── domain/
  │     ├── models/
  │     └── repositories/
  ├── presentation/
  │     ├── controllers/
  │     ├── pages/
  │     └── widgets/
  ├── utils/
  │     ├── constants/
  │     ├── extensions/
  │     └── resources/
  └── main.dart
The config folder includes the configuration of the app (themes, router, ..etc) and anything else related to the app’s configurations.
The utils folder, on the other hand, includes (constants, extensions, resources, ..etc) and anything related to that.
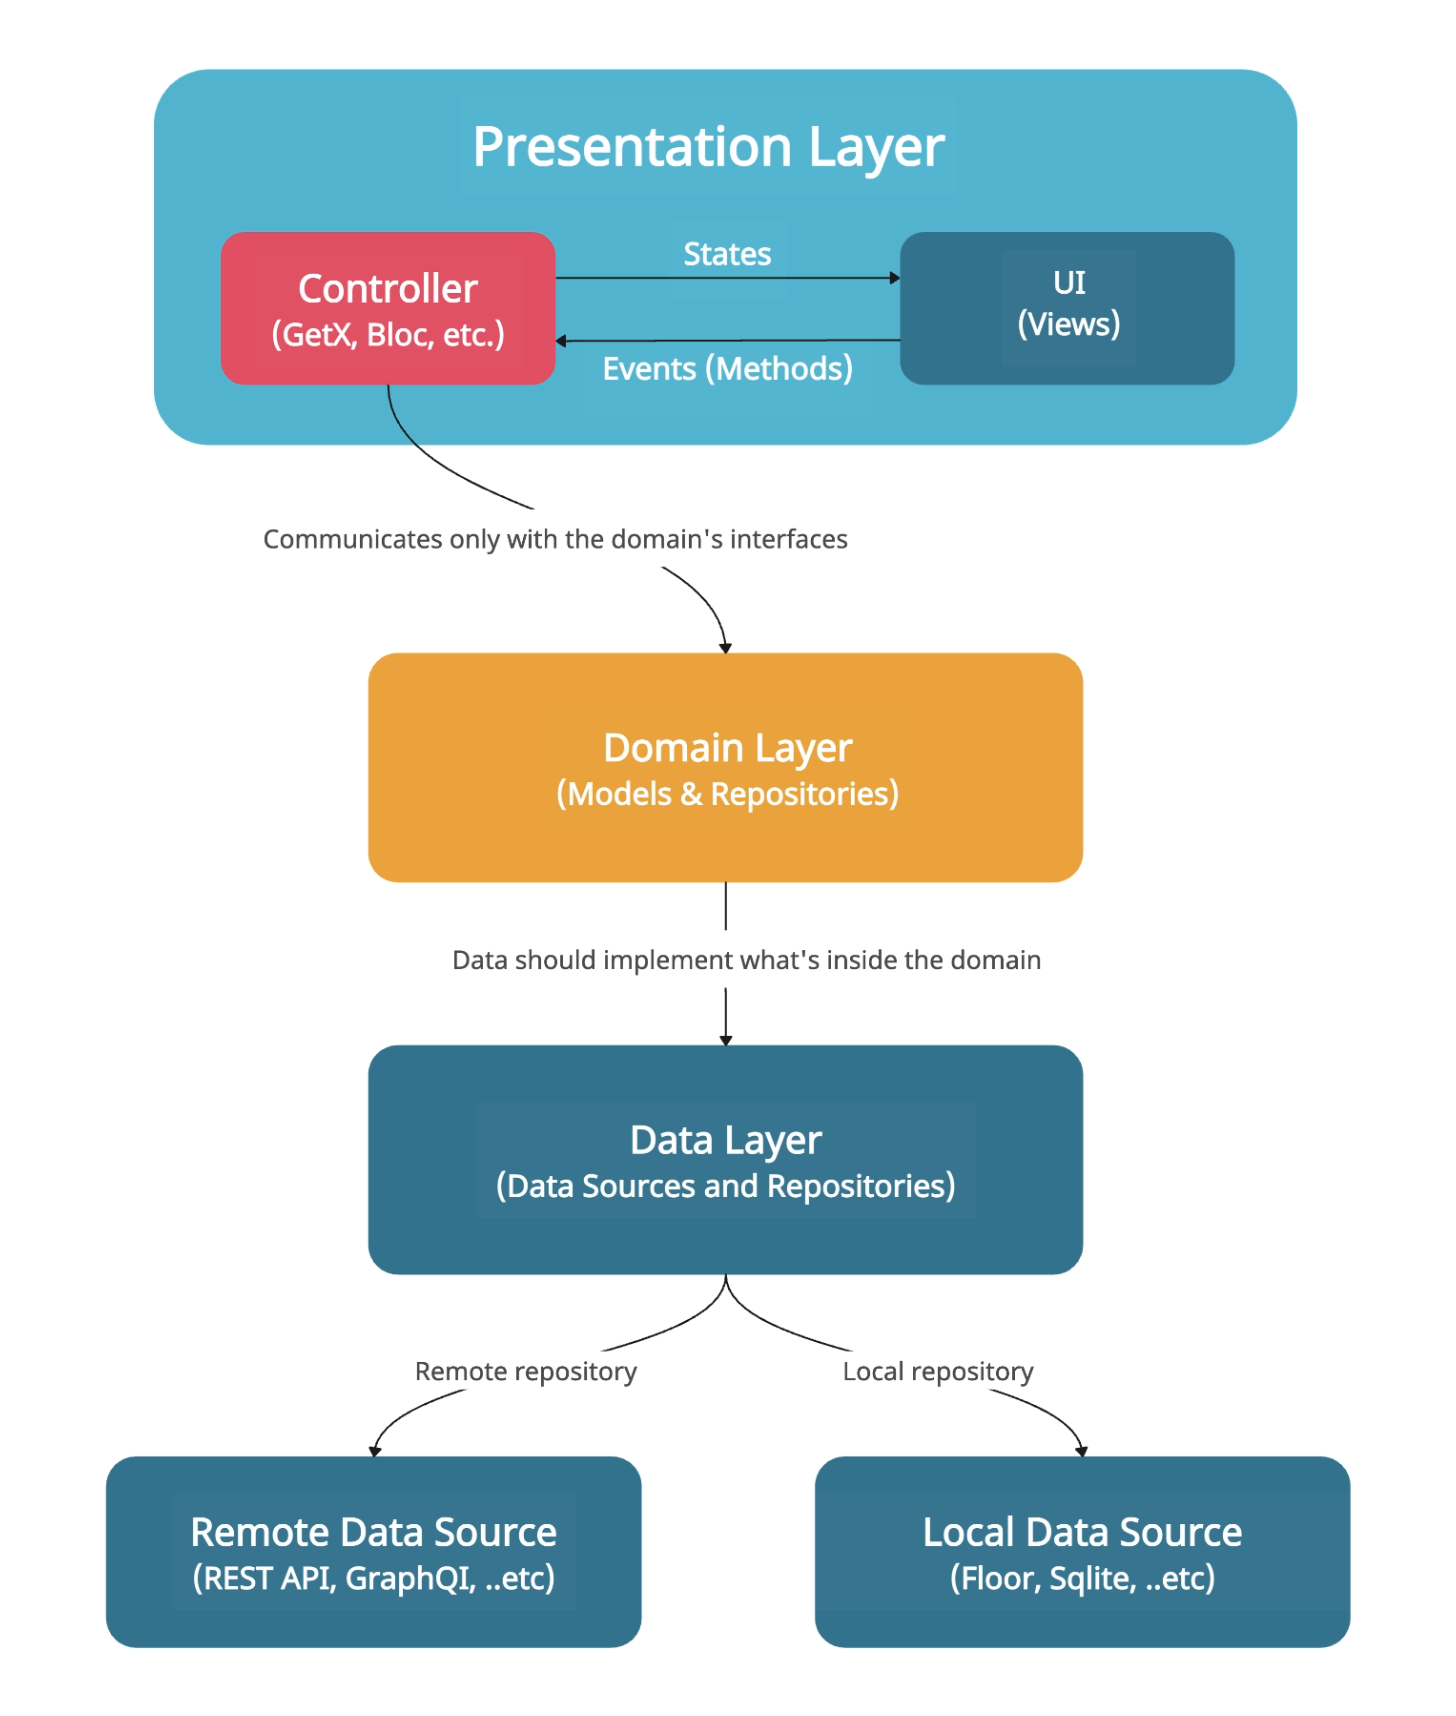
The (data, domain and presentation) folders will be explained later in detail.
Architecture and Dependency Rules
The clean architecture consists of three primary layers:
Data Layer: Responsible for data fetching and caching.
Domain Layer: Houses the core business logic.
Presentation Layer: Manages the user interface and user interactions.
Each layer has its unique responsibilities, and dependencies flow inward. The Data Layer is independent, the Domain Layer depends on Data, and the Presentation Layer relies on both Data and Domain.
App Configuration
Before diving into the layers, let's configure our app. Here's a sneak peek:
Routing
Routing is a fundamental aspect of any Flutter app. We'll use the go_router package to handle navigation efficiently.
You can absolutely choose whatever the routing package you prefer, and that suits your needs.
Now, after adding the package to your pubspec.yaml file as we talked about it at the beginning of the article, create a folder in this path lib/config and call it router, then inside the folder create a file and name it app_router.dart as shown below:
@singleton
class AppRouter {
  final GoRouter _router = GoRouter(
    debugLogDiagnostics: true,
    initialLocation: '/',
    routes: [
      GoRoute(
        path: '/',
        builder: (context, state) => const HomeScreen(),
      ),
      GoRoute(
        path: '/profile',
        builder: (context, state) => const UserDetailsScreen(),
      ),
      ...
      // Add more routes as needed
  );

  GoRouter get router => _router;
}
Theme
Defining a global theme ensures consistency in your app's appearance. Let's create a file app_theme.dart inside lib/config/themes:
import 'package:dtdcopedia/config/themes/app_colors.dart';
import 'package:flutter/material.dart';

abstract class AppTheme {
  static ThemeData get light {
    return ThemeData(
      appBarTheme: const AppBarTheme(
        elevation: 0,
        color: AppColors.primary,
      ),
      scaffoldBackgroundColor: AppColors.background,
      primaryColor: AppColors.primary,
      splashColor: Colors.transparent,
      fontFamily: 'Hind',
    );
  }

  static ThemeData get dark {
    return ThemeData(
      appBarTheme: const AppBarTheme(
        elevation: 0,
        color: AppColors.primary,
      ),
      scaffoldBackgroundColor: AppColors.text,
      primaryColor: AppColors.primary,
      splashColor: Colors.transparent,
      fontFamily: 'Hind',
    );
  }
}
This sets up your app's global theme with the specified colors, fonts, and more. You can customize it the way you like.
Utils
In the utils folder, you can organize your utility functions, constants, extensions, and resources neatly. Here's an example structure:
lib/
  ├── utils/
  │     ├── constants/
  │     │     └── app_constants.dart
  │     ├── extensions/
  │     │     ├── string_extensions.dart
  │     │     └── date_extensions.dart
  │     ├── resources/
  │     │     └── data_state.dart
  │     └── ...
  └── ...
For example, in app_constants.dart:
class AppConstants {
  static const String appTitle = 'Flutter Clean Architecture';

 // Networking and APIs
  static const String baseUrl = 'https://appi.example.com/';
  static const String defaultApiKey = 'YOUR_API_KEY';

 // Storage and Databases
 static const String appTableName = 'app_table';
 static const String databaseName = 'app_database.db';
}
And in string_extensions.dart:
extension StringExtensions on String {
  String capitalize() {
    return "${this[0].toUpperCase()}${this.substring(1)}";
  }
}
In the lib/utils/resources create a file and name it data_state.dart which contains the following code:
import 'package:dio/dio.dart';

abstract class DataState<T> {
    final T data;
    final DioError error;
    const DataState({this.data, this.error});
}

class DataSuccess<T> extends DataState<T> {
    const DataSuccess(T data): super(data: data);
}

class DataFailed<T> extends DataState<T> {
    const DataFailed (DioError error): super(error: error);
}
This wrapper class DataState can be used to wrap our entire network call in order to determine the state of the request being sent to the server and its response.
As you can see in the code, we’ve two different states, one when we get a successful response (DataSuccess), and the other when an error occurs while sending the request or receiving the response (DataFailed).
This is very important as later on when we will have too many requests and logic, you will see how minimized the code will become.
Dependency Injection
Dependency injection is a crucial part of clean architecture. We use get_it and injectable to manage our dependencies efficiently. Here's a glimpse of how it works:
First, inside lib/config/injection, create a file named injection.dart:
import 'package:get_it/get_it.dart';
import 'package:injectable/injectable.dart';
import 'injection.config.dart';

final locator = GetIt.instance;

@InjectableInit()
Future<void> configureDependencies() {
  return locator.init();
}
Now, create a file named register_module.dart inside the same folder. Here we can inject third party packages such as SharedPreferences & Dio:
import 'dart:io';

import 'package:dio/dio.dart';
import 'package:injectable/injectable.dart';
import 'package:pretty_dio_logger/pretty_dio_logger.dart';
import 'package:shared_preferences/shared_preferences.dart';

@module
abstract class RegisterModule {
  // Inject SharedPreferences
  @preResolve
  Future<SharedPreferences> get prefs => SharedPreferences.getInstance();

  // Inject Dio
  @lazySingleton
  Dio dio(SharedPreferences sharedPreferences) {
    final token = sharedPreferences.getString('token') ?? '';

    return Dio(
      BaseOptions(
        baseUrl: AppConstants.baseUrl,
        headers: {
          if (token.isNotEmpty) HttpHeaders.authorizationHeader: "Bearer $token",
        },
      ),
    )..interceptors.add(
        PrettyDioLogger(
          requestHeader: true,
          requestBody: true,
          responseHeader: true,
          maxWidth: 120,
        ),
      );
  }
}
Now you can import and use these utility functions, constants & injected modules throughout your project for a clean and organized codebase. Finally, the main.dart file will look like this:
void main() async {
  WidgetsFlutterBinding.ensureInitialized();
  await configureDependencies();
  runApp(const MyApp());
}

final _router = locator<AppRouter>().router;

class MyApp extends StatelessWidget {
  const MyApp({super.key});

  @override
  Widget build(BuildContext context) {
    return MaterialApp.router(
      debugShowCheckedModeBanner: false,
      title: AppConstants.appTitle,
      theme: AppTheme.light,
      darkTheme: AppTheme.dark,
      routerConfig: _router,
    );
  }
}
Domain Layer
Now, let's dive into the Domain Layer. The Domain Layer is the core of the application's business logic. It encapsulates the rules, behaviours, and core functionality that define how the application operates. This layer is entirely independent of external factors such as databases, network calls, or the user interface.
In Clean Architecture, the Domain Layer should be independent of any specific implementation or framework. This means that the code in the Domain Layer should be written in a technology-agnostic way, with no dependencies on external systems or libraries.
Entities (Models)
Entities/Models are plain Dart classes that represent the core business objects of the application. They model the data that the app operates on and typically contain minimal logic. Entities are defined solely based on the business requirements, and they do not contain any database-specific or UI-related code.
Freezed helps us create immutable data models effortlessly. Here's a sample domain model user.dart inside lib/domain/models:
part 'user.freezed.dart';

@freezed
class User with _$User {
  const factory User({
    required int id,
    required String name,
    // Add more fields as needed
  }) = _User;
}
Repositories (Abstract Definitions)
In the Domain Layer, repositories are defined as abstract classes or interfaces. These abstract definitions declare the methods for interacting with data without specifying how data is fetched or stored. The concrete implementations of these repositories are located in the Data Layer.
Repositories are interfaces that define data sources for our domain layer. For example, user_repository.dart inside lib/domain/repositories:
abstract class UserRepository {
  Future<UserEntity> getUserById(int id);
}
Data Layer
The Data Layer is the foundational layer responsible for handling data operations in a Flutter app. Its primary purpose is to abstract and encapsulate data sources, ensuring that the rest of the application doesn't need to know the specifics of data retrieval and storage.
Data Sources
Data Sources are responsible for interacting with external data providers, such as APIs, databases, or local storage. They define the interfaces for fetching and storing data. This layer is typically implemented using packages like Retrofit, Dio, or other HTTP client libraries for API interactions, as well as database libraries like SQFLite for local storage.
Here's a sample data source service user_data_source.dart inside lib/data/datasources/remote:
@RestApi(baseUrl: 'https://api.example.com/')
abstract class UserDataSource {
  factory UserDataSource(Dio dio) = _UserDataSource;

  @GET('/users/{id}')
  Future<UserEntity> getUserById(@Path() int id);
}
Now, create data_source_injection.dart file inside lib/config/injection and inject the UserDataSource class as a module:
import 'package:dio/dio.dart';
import 'package:your_package_name/data/datasources/remote/user_data_source.dart';
import 'package:injectable/injectable.dart';

@module
abstract class DataSourceInjectableModule {
  UserDataSource getUserDataSource(Dio dio) => UserDataSource(dio);
  // Add more data dources as needed
}
Repositories (Implementation)
Repositories act as intermediaries between Data Sources and the Domain Layer. They provide a clean and consistent API for accessing data. Repositories are defined as abstract classes in the Domain Layer, listing methods like getUserById() or fetchPosts(). The concrete implementations of these repositories, found in the Data Layer, interact with Data Sources to fetch and manipulate data. Repositories also manage data caching and storage.
Before we implement the UserRepository class, we need to create a base class called BaseApiRepository, create a folder inside the data folder and name it base, then create a file inside it and name it base_api_repository.dart which contains the following:
import 'dart:io' show HttpStatus;
import 'package:retrofit/dio.dart';

import 'package:dio/dio.dart';
import 'package:your_project_name/utils/resources/data_state.dart';
import 'package:flutter/material.dart';

abstract class BaseApiRepository {
  @protected
  Future<DataState<T?>> getStateOf<T>({
    required Future<HttpResponse<T>> Function() request,
  }) async {
    try {
      final httpResponse = await request();
      if (httpResponse.response.statusCode == HttpStatus.created || httpResponse.response.statusCode == HttpStatus.ok) {
        return DataSuccess(httpResponse.data);
      } else if (httpResponse.response.statusCode == HttpStatus.unauthorized) {
        throw DataFailed(DioException(
          response: httpResponse.response,
          requestOptions: httpResponse.response.requestOptions,
        ));
      } else {
        throw DioException(
          response: httpResponse.response,
          requestOptions: httpResponse.response.requestOptions,
        );
      }
    } on DioException catch (error) {
      return DataFailed(error);
    }
  }
}
This base class plays an important role here, which wraps our API call that comes from the data source user_data_source.dart and return a DataState object instead of HttpResponse.
By doing so, we’re reducing the boilerplate code in each method without the need to write “try-catch” or “if” statements everywhere because you only need to pass the request in the “getStateOf” method and this should do the rest and return the result based on the generic “T” type.
Now create user_repository_impl.dart inside lib/data/repositories & implement the previously defined UserRepository class as below:
@Injectable(as: UserRepository)
class UserRepositoryImpl extends BaseApiRepository implements UserRepository {
  final UserDataSource _userDataSource;
  UserRepositoryImpl(this._userDataSource);

  @override
  Future<DataState<User?>> getUserById(int id) {
    return getStateOf<User>(
      request: () => _userDataSource.getUserById(id),
    );
  }
}
Presentation Layer
Last but not least, we arrive at the Presentation Layer, where we build the user interface, controllers, screens, and common widgets.
The benefit of using Presentation Layer is that it makes the codebase more modular and maintainable. By separating the user interface from the business logic and infrastructure, it becomes easier to modify and extend the application over time. Also, it allows for different user interfaces to be developed and used with the same underlying business logic. For example, a web application, a mobile application, and a desktop application could all use the same Domain Layer but have different Presentation Layers that are optimized for their respective platforms.
Controllers
Controllers manage the state and business logic of our app. Here's a snippet of a controller user_controller.dart inside lib/presentation/controllers using GetX:
class UserController extends GetxController {
  static UserController get call => Get.find();

  final UserRepository _userRepository = locator<UserRepository>();
  final Rx<User> user = Rx<User>(User(id: 0, name: ''));

  Future<void> fetchUser(int id) async {
    final result = await _userRepository.getUserById(id);
    user.value = result;
  }
}
Screens
Screens are where the magic happens. Screens correspond to the different views or pages of the app. Each screen is typically represented by a Flutter widget. Screens are responsible for rendering the UI and displaying data to the user.
You can create screen files inside lib/presentation/screens folder. For example, here's user_details_screen.dart:
class UserDetailsScreen extends StatefulWidget {
  const UserDetailsScreen({super.key});

  @override
  State<UserDetailsScreen> createState() => _UserDetailsScreenState();
}

class _UserDetailsScreenState extends State<UserDetailsScreen> {
  @override
  void initState() {
    // Initialize & inject UserController() using Get.put()
    Get.put<UserController>(UserController(), permanent: true);
    super.initState();
  }

  @override
  Widget build(BuildContext context) {
    final controller = UserController.call;
    final userIdController = TextEditingController();

    return Scaffold(
      appBar: AppBar(
        title: Text('User Details'),
      ),
      body: Padding(
        padding: const EdgeInsets.all(16.0),
        child: Column(
          children: [
            TextField(
              controller: userIdController,
              decoration: InputDecoration(labelText: 'Enter User ID'),
              keyboardType: TextInputType.number,
            ),
            SizedBox(height: 16.0),
            ElevatedButton(
              onPressed: () {
                final userId = int.tryParse(userIdController.text);
                if (userId != null) {
                  controller.fetchUser(userId);
                } else {
                  // Handle invalid input
                  Get.snackbar('Invalid Input', 'Please enter a valid User ID',
                      snackPosition: SnackPosition.BOTTOM);
                }
              },
              child: Text('Fetch User'),
            ),
            SizedBox(height: 16.0),
            Obx(() {
              if (controller.isLoading.value) {
                return CircularProgressIndicator();
              } else if (controller.user.value.id == 0) {
                return Text('User details will appear here');
              } else {
                return Column(
                  crossAxisAlignment: CrossAxisAlignment.start,
                  children: [
                    Text('User ID: ${controller.user.value.id}'),
                    Text('Name: ${controller.user.value.name}'),
                    // Add more user details as needed
                  ],
                );
              }
            }),
          ],
        ),
      ),
    );
  }
}
Run
Install Dependencies: Ensure that you have all the required packages and dependencies installed. Run the following command:
flutter pub getGenerate Code: Since our app uses code generation tools like
freezed,json_serializable, etc., it's important to generate necessary code files. Run the following command:flutter pub run build_runner build --delete-conflicting-outputsThis command generates code that's needed for serialization, deserialization, and more. The
--delete-conflicting-outputsflag helps resolve any conflicts that may arise during code generation.Run the App: Finally, you can launch the app using the following command:
flutter run
Conclusion
Congratulations! 🥳 You've just embarked on a thrilling journey of implementing clean architecture in Flutter using GetX. Clean architecture can be a bit challenging at first, but once you get the hang of it, it makes your code more maintainable and scalable.
So, go forth and create amazing Flutter apps with clean architecture. Happy coding! 🚀📱✨